Options for the individual integration of documents in onboard.
Upload documents individually in the file
The digital employee file offers a comprehensive filing system for your documents. By individually selecting folders and subfolders, you can flexibly adapt it to your needs.
And this is how it works:
- Click on the desired employee in the side menu under “Talent management” under “Employee files”
- You are now in the overview
- Switch to the “Documents” tab
- You will find an upload field below the folder structure
- Drag the file for the upload into the field or select the document from your device
- Select a document folder/subfolder for filing
- Alternatively:
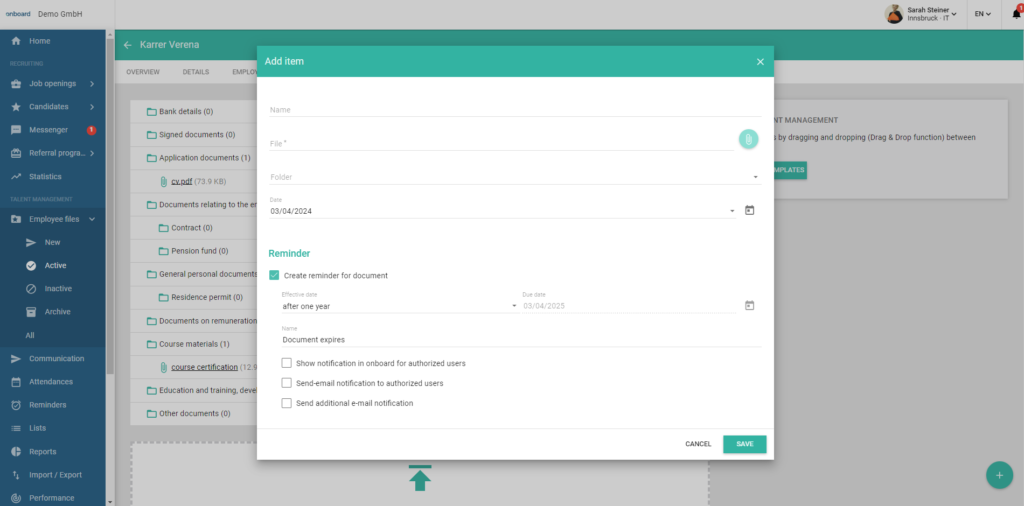
Click on the “+” button at the bottom right. The “Add entry” pop-up opens, where you can upload the document, name it, select a folder for filing and set a reminder for the document due date. - If necessary, the documents can be moved to another folder/subfolder via “Drag & Drop”.
Upload multiple files at the same time
The prerequisite for using this import function is the unique identification of the documents so that they can be recognized during import, assigned to the correct employee file and stored in the desired folder. The Italian tax number serves as a reference. In order for the import to be carried out correctly, it is necessary that the identical tax number is present both as a file name and in the employee file.
And this is how it works:
- Click on “Import/Export” in the side menu under “Talent management”
- You are now on the import page
- Click on the “+” button at the bottom right
- Select the “Documents” option
- The “Import” pop-up opens
- Upload your ZIP file or your (multi-page) PDF here
Please note:
The file name must contain the Italian tax number of the employee - Select the folder for filing
- Click on “Save”
- The file will now be checked
- As soon as the check is complete, a gray icon appears
TIP: The gray icon means that the file has been uploaded and checked but not imported - Click on the created entry in the import list
- Here you can check whether all files are created correctly
- Click on “Import”
- The documents are now saved in the folders of the corresponding employee files
- Depending on how many documents are imported, the process may take a moment. You can see the progress in the percentage display
- As soon as the import has been completed, the green “Import successful” icon appears
Frequently asked questions
Is individual document import also possible outside Italy?
As the Italian tax number is required for the individual import as a unique reference number for the correct assignment to the employee file, this function is only possible for employees from Italy.